SpriteTracer 6.0
By Grim (admin@spritedatabase.net) - http://spritedatabase.net
SpriteTracer
is a program that helps automate every step in the process of ripping
sprites, allowing you to take screenshots, edit sprites out of them,
and organize those sprites into a sheet.
This program is Windows-only
and requires the .NET framework.
This guide will walk you through the process of using the program to edit several screenshots into a single sprite animation as seen on a typical sprite sheet.
Loading a Source image
SpriteTracer is named for its ability to "trace" sprites out of images by deleting the background. To do this, you will need a Source image and one or more Target images.The Source is an image that will tell the program what colors to keep when editing screenshots. Any colors *not* included in the Source will be deleted when using Erase background.
There are three ways to load a Source into SpriteTracer.
 Open - Load a file from your computer.
 Paste - Paste in an image from the clipboard.
 New
- Create a Source image from an existing unedited image. For
instructions on how to do this, see the instructions below in the
section "Creating a Source Image".
New
- Create a Source image from an existing unedited image. For
instructions on how to do this, see the instructions below in the
section "Creating a Source Image".
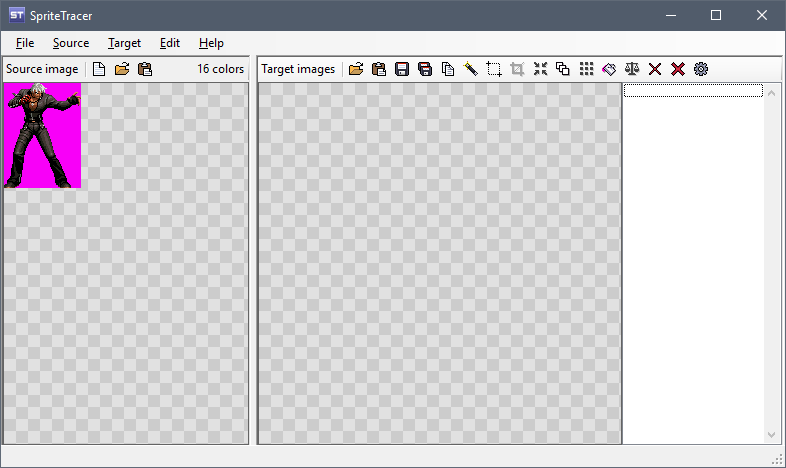
Notice that the source image now shows in the Source panel, and the color count is displayed as well.
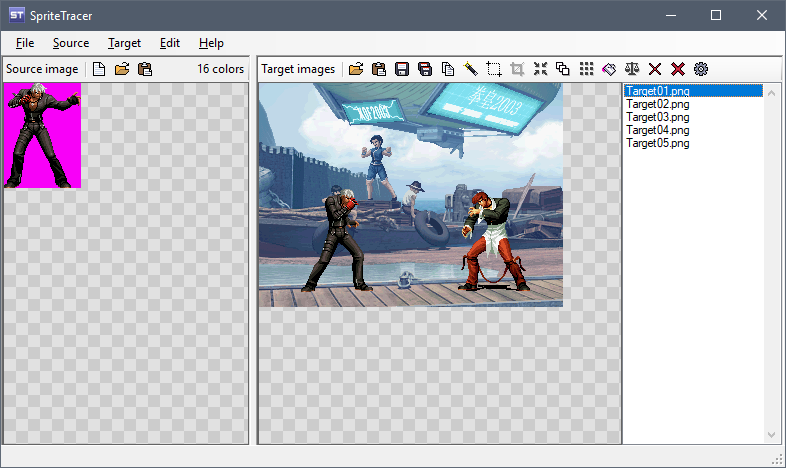
Loading Target images
Now we're ready to load some Target images. The Target is the image (or images) that will be edited by the program. Like the Source, there are a few ways to load them in:- Open - Load one or more files from your computer.
- Paste - Paste in an image from the clipboard.
- Capture the currently active window.
- SpriteTracer will automatically capture screenshots of whatever
program you have active when you hit the PrintScrn key. It won't work
with Alt+PrintScreen, just PrintScreen.
This feature is turned on by default, but you can disable it by navigating to File > Settings and unchecking "Enable screen capture".
Using Erase background
Now that we have a Source and some Targets, we can finally edit the background out of these screenshots. All you have to do is click the Erase background icon or use the shortcut key CTRL+E
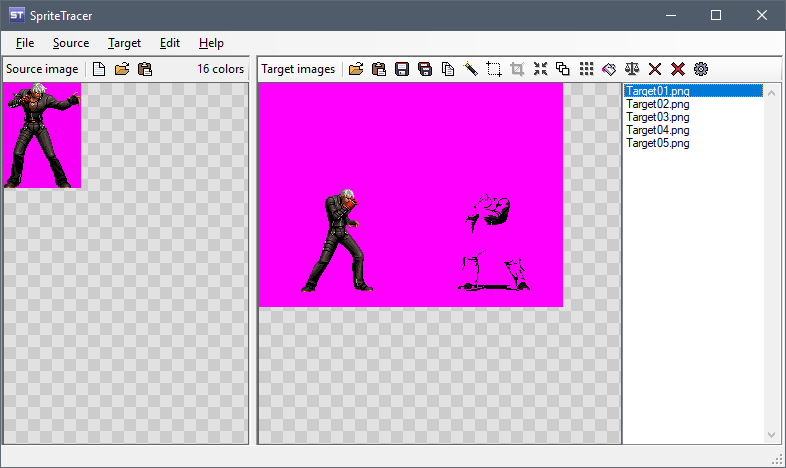
As you can see, every color not found in the Source image has been deleted in the Target images. This includes the character we're focusing on, and some other pixels that just happened to have the same colors. But we can get rid of those in the next step.
Making a selection and cropping
In order to cut down on excess space, we can Crop our target images down to a more reasonable size. See the below animation for an explanation.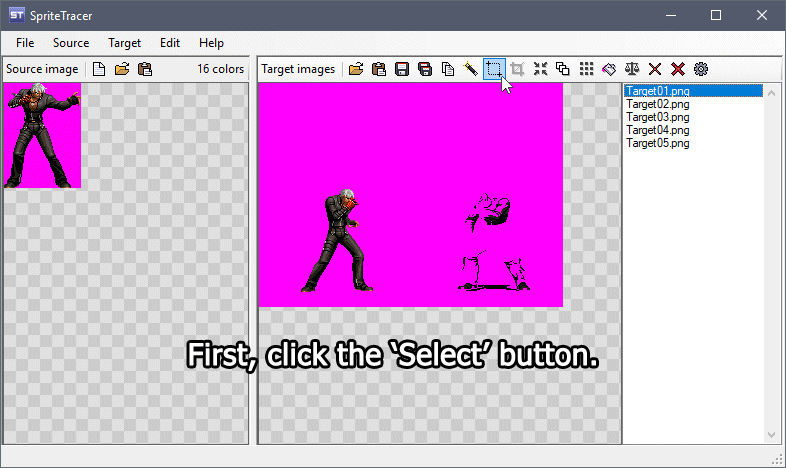
- First, we click the
 Select icon. At the bottom left of the window you will see the instruction "click the top-left cropping coordinates".
 - Then, inside the target panel, we click in a spot to the upper left of the character. At this point, the instruction changes to "click the bottom-right cropping coordinates".
- Click in a spot over to the character's lower right. At this point, you will see a rectangle indicating the cropping area.
- You can scroll through all of your target images to make sure they fit safely inside the rectangle, as in the animation above.
- If you are satisfied with the rectangle you've chosen, you can now click the
 Crop icon.
This will crop all target images to just the area you've chosen. Again,
in the animation above you can see that all five images have been
cropped to the same size.
Crop icon.
This will crop all target images to just the area you've chosen. Again,
in the animation above you can see that all five images have been
cropped to the same size.
- Tip: instead of clicking the icon, you can crop faster by holding the CTRL key during your second click. This will automatically crop all the images.
- Tip: instead of clicking the
Additional tips:
- You can crop your images more than once if necessary.
- You won't be able to make a selection that goes outside the dimensions of any of your target images.
- Opening or pasting additional target images will deselect the current selection.
- You can crop images before erasing the background, and doing so will actually make the process a little faster since there will be fewer pixels for the application to analyze.
- If you don't like the selection you made or you decided not to crop
after all, you can cancel by navigating to Edit > Selection
>
 Deselect or by pressingCTRL+D.
 - It is also possible to expand, shrink, or move the selection box:
- Use CTRL+Arrow Keys to move the top-left corner of the selection box.
- Use ALT+Arrow Keys to move the bottom-right corner of the selection box.
- Use CTRL+ALT+Arrow Keys to move the entire selection box.
When you're done cropping, we can move onto the next step.
Using Trim
- The
 Trim tool eliminates all the space around each image.
 - The
 Trim Horizontal tool only eliminates the space to the left and right of the images.
 - The
 Trim Vertical tool only eliminates space at the top and bottom of the images.
| Original Image | Trim |
Trim Horizontal |
Trim Vertical |
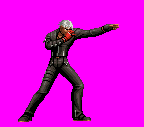 |
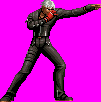 |
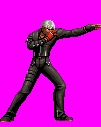 |
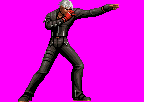 |
Combining your images
There are two ways to combine your target images into one final product.The
 Combine tool combines all your target images into one row or column.
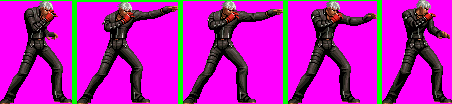
How the resulting image comes out will depend on your settings. In this example the spacing color was set to green, the spacing set to 5 pixels, the combination type set to 'row', and the alignment set to 'bottom'.
For combining images into multiple rows, there is the
 Grid combine tool.
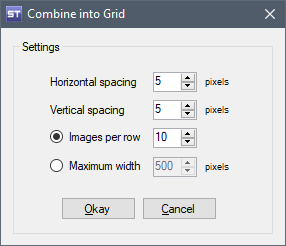 |
|
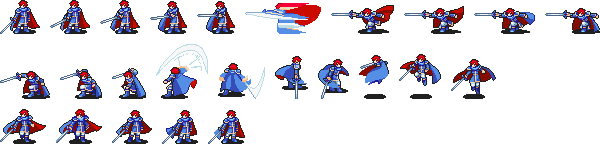
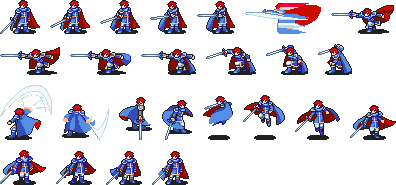
Here are two different grid results using the same 25 target images.
In this example, we set horizontal and vertical spacing to 10px each, and images per row to 10.
In this example we also use 10px for the horizontal and vertical spacing, but instead of images per row, we use a maximum width of 400 px.
Export your results
Target images can be exported at any point in the process. Save the selected image straight to the hard drive a a .PNG file.
 Save all result images to the hard drive as .PNG files.
- Each file will be numbered with the filename you enter as a prefix.
For example, if you enter "screen" you will get screen0001.png, screen0002.png, etc. This will overwrite existing files with those names.
- Each file will be numbered with the filename you enter as a prefix.
 Copy the selected image to the clipboard so you can paste it into your main graphics editor, such as Paint or Photoshop.
 - Note that if your image has a transparent background, copying will convert the transparency to grey. Save the image instead.
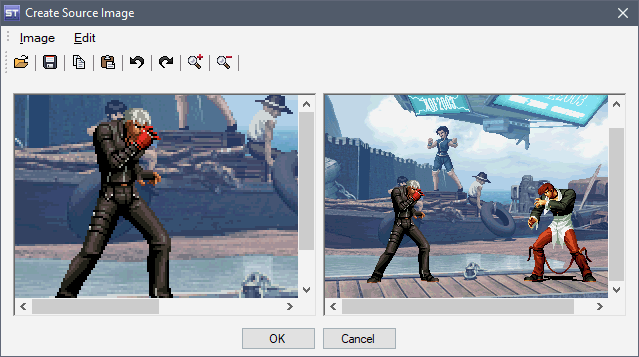
Creating a Source image in SpriteTracer
If you don't have a source image to start with, you can create one inside SpriteTracer.
- In SpriteTracer, click Create New Source or use the keyboard shortcut CTRL+N. The Create New Source interface will appear.
- Load the file you want to base your Source on with either Open or Paste.
- The selected image will appear in both the left and right panels of the Create Source Image window. The left panel will contain the original, while the right contains a preview of the changes you will be making. At first they will look the same.
- You can interact with the left panel in a few ways.
- Click the
 Zoom In and
  Zoom Out button
to change the image size, or use the keyboard
shortcuts CTRL++ and CTRL+-. Note that you cannot zoom
out smaller than the image's original size.
Zoom Out button
to change the image size, or use the keyboard
shortcuts CTRL++ and CTRL+-. Note that you cannot zoom
out smaller than the image's original size. - Click and drag with the mouse to pan the image back and forth. If you lose track of the image simply zoom in, then out, to reset its position.
- You can also use the scrollbars built into the panel to look around the image.
- Click the
- To begin selecting colors to use in the final Source image, hold
the CTRL key and click the colors you want on the image in
the left panel. When holding the CTRL key, your mouse cursor
will change to a color dropper (
 )
and the color your mouse cursor is currently pointed at will appear in
the toolbar. Without letting go of CTRL, click to add that color
to the new source image. As you click additional colors, the right
panel image will update to include only the colors you have picked. If
you are having trouble selecting the right colors, use the Zoom In tool
to get a better view.
)
and the color your mouse cursor is currently pointed at will appear in
the toolbar. Without letting go of CTRL, click to add that color
to the new source image. As you click additional colors, the right
panel image will update to include only the colors you have picked. If
you are having trouble selecting the right colors, use the Zoom In tool
to get a better view.
- If you make a mistake, you can undo by clicking the
 Undo button, or use the keyboard shortcut CTRL+Z. You can also redo; click the
  Redo button or use CTRL+ALT+Z. Note that if you use undo, then make new changes, you won't be able to redo what you undid.
 - Also note that as you click on more colors, the toolbar will show how many you have selected. This does not include the background color.
- If you make a mistake, you can undo by clicking the
- When you are done, the right panel should only contain the sprite
you will be using as the source. At this point you can save the image
for future use - click Save or
use CTRL+S. When you are done, click OK to return to the main
SpriteTracer window, where the new source image will already be loaded.
If you want to return to SpriteTracer without using the image you've created, click Cancel instead.
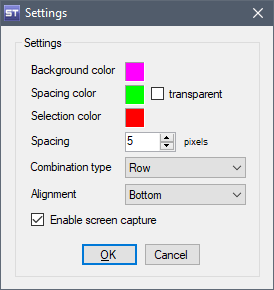
Settings
SpriteTracer has a number of options you can adjust via the  Settings menu.
 |
|
Functions
The following is a list of all functions in SpriteTracer, including a short description of what they do. Most functions also have a keyboard shortcut to make them more accessible.
| Icon | Function | Keyboard shortcut |
|
New source image Create a new source image using the Create Source Image interface. |
CTRL+N |
|
Open source image Load a source image from your computer. |
CTRL+SHIFT+O |
|
Paste source image Paste a source image from the clipboard. |
CTRL+SHIFT+V |
|
Open target images Load one or more target images from your computer. |
CTRL+O |
|
Paste target image Paste a target image from the clipboard. |
CTRL+V |
|
Save target image Save the selected target image to your computer. |
CTRL+S |
|
Save all target images Save all target images to your computer. Images will be numbered starting with 0001. |
CTRL+SHIFT+S |
|
Copy target image Copy the current target image to the clipboard. |
CTRL+C |
 |
Delete target image Delete the current target image from the list. |
DEL |
 |
Delete all target images Delete all target images from the list. |
SHIFT+DEL |
|
Erase background For each target image, replace all colors that are not included in the source image. |
CTRL+E |
|
Combine Combine target images into a single row or column. |
CTRL+J |
|
Grid combine Combine all target images into one or more rows. |
CTRL+G |
 | Flood fill Fills in all connected pixels of the color you click with the background color. | (none) |
 |
Balance Adjust all target images to the same dimensions. |
CTRL+B |
|
Select Create a selection - an area that can be cropped or deleted. |
(none) |
|
Deselect Undo the current selection. |
CTRL+D |
|
Crop Crops all target images to only include the selected area. |
CTRL+X |
 |
Clear selection Replace every pixel inside the selection area with the background color. Affects only the current target image. |
CTRL+DEL |
|
Trim Shrinks all target images to their minimum size by eliminating empty space in the image. |
CTRL+W |
|
Trim horizontal Shrinks all target images to their minimum width by eliminating empty space to the left and right of the image. |
CTRL+H |
|
Trim vertical Shrinks all target images to their minimum height by eliminating empty space at the top and bottom of the image. |
ALT+V |
 |
Mirror Reverse the current target image horizontally. |
CTRL+M |
 |
Mirror all Reverse all target images horizontally. |
CTRL+SHIFT+M |
 |
Flip Reverse the current image vertically. |
CTRL+I |
 |
Flip all Reverse all target images vertically. |
CTRL+SHIFT+I |
 |
Rotate left Rotate the current target image 90 degrees to the left. |
CTRL+L |
 |
Rotate left all Rotate all target images 90 degrees to the left. |
CTRL+SHIFT+L |
 |
Rotate right Rotate the current target image 90 degrees to the right. |
CTRL+R |
 |
Rotate right all Rotate all target images 90 degrees to the right. |
CTRL+SHIFT+R |
Notes
- Large images, large amounts of target images, and source images with many colors may cause the program to run slowly or even crash.
- The Erase Background function is best used with emulators lacking layer disable features, or games where such features are present but not that helpful.
- You can load new targets while keeping the same source, and vice versa.
Version History
- 6.0 (6/6/2017)
- Overhauled the UI - can now be resized and maximized
- Added support for saving images with transparency & transparent spacing option
- Added ability to re-order target images via drag & drop
- Added Mirror All, Flip All, and Rotate All functions
- Added Flood Fill tool
- Added Grid combine function
- Added Balance function
- Added Horizontal trim & Vertical trim functions
- Added wait cursor for processing and cross cursor for Select tool
- Lots of bugfixes and error-checking
- 5.0 (5/8/2015)
- Added the ability to move and resize selections
- Added Settings menu with new features - Spacing color, Outline color, and Combination type.
- Added Resize button to Target panel
- Moved, reworded, and changed various minor functions
- Minor bugfixes again
- 4.1 (3/29/2014)
- Added Mirror, Flip, and Rotate functions
- Added hotkeys for Trim and Erase background functions
- More (very) minor fixes
- 4.0 (3/20/2014)
- Increased Target and Source panel sizes
- Added the ability to delete single Target images (DEL), rather than deleting all at once (SHIFT+DEL.)
- Added Crop, Trim, and Combine features and associated functionality.
- Added automatic screenshot capture via PrintScreen.
- Removed the progress bar
- Minor bugfixes (I've always wanted to say that!) and UI adjustments
- 3.0 (8/25/2013)
- Added "Create Source Image" interface and associated functionality (see above.)
- Added keyboard shortcuts for Source image functions
- Added progress bar for image processing
- Layout overhaul (new icons, new hotkeys, reorganized menu strip)
- Added leading zeroes to filenames, ie screen_0001.png rather than screen_1.png
- 2.1 (2/5/2012)
- Added keyboard shortcuts.
- Improved memory management (open files can now be changed or deleted by other applications.)
- 2.0 (1/10/2012)
- Added the ability to store multiple target images, and updated other features accordingly.
- Added Save all feature.
- Improved layout slightly.
- Added better color selection using ColorDialog.
- 1.0 (1/05/2012)
- Initial release; able to process one target image at a time.